
This is Sol's complete rank 1 Templar build for AION 2 Global Launch - the exact gear, stats, skills, Daeva board pathing, Arcana, Pantheon, and pets behind a Rank 1 Challenger 1v1 Arena character. The headline point running through the whole build: stats over gear score. Sol is not pay-to-win, not stat-padding, and is still using a quest off-hand - every advantage here comes from building the right stats and skill synergy, not from swiping.
🧰 Tools: NotMeter & ExitLag
Before the in-game build, two external tools supplement everything else and make the build more successful.
NotMeter is both a DPS meter and a field boss timer tracker. Two reasons it matters for Templar (and every class):
- Field boss tracking. Bosses like Eternal, Isle, Vertua, and Dartain drop gear - get two pieces and you turn it in for a Supply Request, which gives AP you spend on stigmas. Mid-to-end game you cannot afford to miss a boss, because missing a boss means missing stats.
- DPS comparison. The in-game meter only shows your own DPS. NotMeter shows the rest of your party. In Transcendence content, one person with low DPS can fail the whole group - you need to see where everyone stands.
- Turn on Field Boss Timers - track Eternal, Vertua, Kashapa, Dartanyan, and Lagta.
- Turn on Alerts for Battlefields (easy to miss) and Spacetime Rifts.
Sol plays from Phoenix (West Coast) on an East Coast server and gets ~50 ping with ExitLag versus 65-70 without it - a 15-20ms reduction. Every millisecond matters in competitive play.
- Optimize for all regions and re-optimize daily for the most stable routing.
- For the Global client, leave routing on Automatic. For the Taiwan client you may want more specific routing.
🧩 Gear Philosophy: Stats Over Score
This is the single most important idea in the entire build, so it comes first. Do not stat-pad. You can inflate your combat power, item level, and gear score all you want, but if the stats are bad, it does not matter.
- Block - your #1 defensive stat as Templar. Build it on every piece you can. Goal: ~1,000 block (you get +200 from Shield Rush and more from passives).
- Accuracy - very important, you cannot hit people in PvP without it.
- Critical Hit - very important for damage.
- Perfect Resistance - very important defensive stat.
- Status Effect Resistance - amplified by Willpower. Sol sits at ~60% base before buffs.
- Willpower - "survival willpower" synergy, amplifies status effect resistance.
Endurance is good if you get it, but block is the main defensive stat. Evasion is fine - Sol runs it on several pieces - but he would prefer block given the choice.
⚔️ Weapon & Off-Hand
Sol is on a +15 Aulamus Longsword (effectively +16, amplified for a damage boost). He only upgraded it to compete with the sweats - ideally you would wait for Fire Temple gear. Because he upgraded it, he is going Nuakum armor first (tankier earlier, more damage later), then Fire Temple.
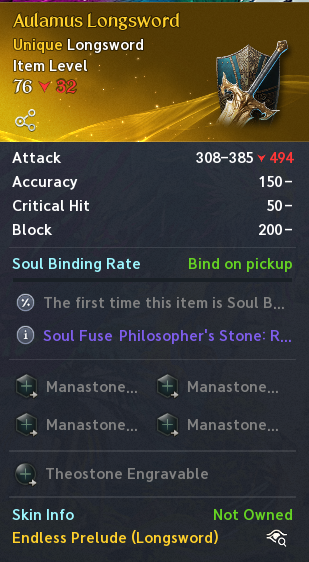
- Current: Attack, Multi Hit, Judgment (good stats). Combat Power ~105, Gear Score ~2,084.
- Going for +20 Judgment - leaving the weapon as-is until he can replace the +1 Judgment.
- Ideal weapon stats: Combat Speed and Precision would be best. Sol would prefer Precision over Judgment on the weapon, but Judgment is good enough to hold.
Manastones go in the weapon; only gold gear is upgraded until you are near best-in-slot. The weapon is soulbound because Sol will rock it a while - through Nuakum gear and up to Fire Temple.
🛡️ Armor & Accessories
Sol's gear path was Vakron first, then Uruguay (covered in the previous gear guide on the channel). This section is about the gear and stats, not the gearing process. The theme throughout: synergy - stacking survival willpower, Fury, defense, critical damage defense, and status effect resistance across pieces.
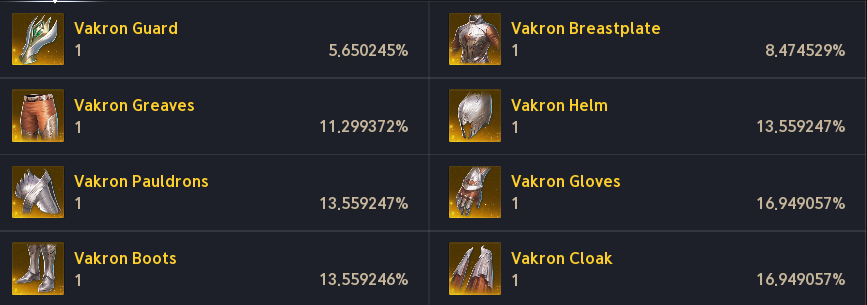
| Piece | Stats Sol Runs | Why |
|---|---|---|
| Helmet | Perfect Resistance + defensives | A really good helmet, but NOT soulbound - it gets replaced by Nuakum gear. |
| Breastplate (Becarma, pity chest) | Status Effect Resist, Willpower, Block, Crit | Willpower amplifies the status effect resist. Block + crit are the priority pair. |
| Blue chest piece | Perfect Chance, Block, Critical Damage Defense | Perfect chance + block = Sol's two best assault stats. Proof a blue beats a bad gold. |
| Gloves | Combat Speed, Accuracy, Survival Willpower | Chosen over a gold pair that lacked combat speed, accuracy, and status effect resist. |
| Cloak | Crit Dmg Tolerance, Crit Dmg Defense, Status Effect Resist | Pure defensive synergy stacking. |
💍 Rings & Bracelet (Skills Over Power)
On rings, skill levels matter more than combat power. This is where the stats-over-score philosophy is most extreme.
- Sol runs blue rings with Judgment and Punishment on them.
- Judgment is level 17 - he needs only 3 more levels (from Arcana cards) to hit level 20 Judgment = berserk Templar damage.
- Punishment is level 16, also going to 20. Annihilate is up there too - it does 10k damage and resets every Shield Rush.
- Level up your Ascension bracelet.
- Level up the Pilgrim bracelet (critical hit + MP come naturally on it). It is the best bracelet from the quest line - you get nothing better until Luger, so keep leveling it for a while.
📊 Stat Priority
Sol's build is built around Might - that's why he does so much attack even without a great weapon. Once the weapon improves and a few more correct Might rolls land, the damage scales hard.
- Might - the primary focus. Drives attack. Keep stacking the correct rolls.
- Attack - already high from the Might focus.
- Accuracy - needs more; essential for landing hits in PvP.
- Combat Speed - more combat speed = more damage (fits more punishing-strike weaves).
- Critical Hit and Penetration (crit regen pen) - penetration is needed to kill self-healing classes (Chanters, healers, anyone with regen). Not best-in-slot but a good PvP stat.
- Block - stacking toward 1,000 (hits ~920 base, +200 on Shield Rush, more from passives).
- Perfect Activation / Perfect Chance - perfect for Templar; want perfects to activate in both PvE and PvP (Justice).
- Defense - always good on Templar.
- Status Effect Resistance - ~60% base before buffs; also stacking some Status Effect Chance.
- Endurance / Damage Tolerance / Double Chance - slowly leaning into endurance.
✨ Skills & Loadouts
Sol runs three loadouts: PvE, PvP, and PvX. The leveling priority for your core DPS skills is fixed, and it also happens to be how you path your Daeva board.
- Pummel - your main DPS. You can miss-strike and Pummel your way through most of the quest line.
- Judgment
- Punishment
- Annihilate
Those are your 4 main DPS skills. Level them in that order.
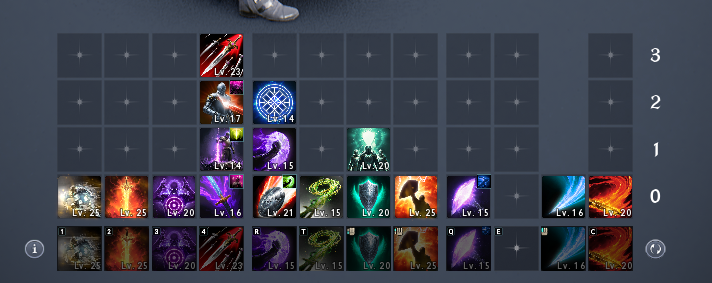
PvE rotation (ideal opener): Shield Smite (triggers Judgment) → Debilitating Smash if it procs (lowers defense) → Judgment → Pummel cancel. Priority logic:
- Annihilate takes priority - use it off cooldown, it does too much damage (more than Judgment, more than Debilitating Smash).
- Debilitating Smash second - for the defense lower and Shield Smite spam.
- Shield Smite typically procs off Debilitating Smash; Annihilate procs off status effect; Flash Rampage situational. When none are up, default to a Pummel.
- After your two seconds of Shield Smite / Warning Strike, go to Doom Shield.
- Battlefield Banner for the defense buff; Punishment off cooldown.
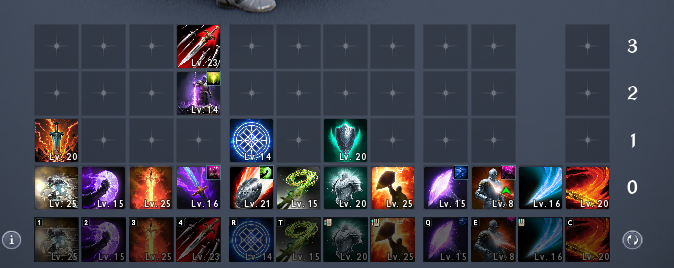
- Executing Blade over Imperion - with Flex Expose (reduces block + evasion 5s). Executing Blade on a low target + Punishment DoT stops healing and secures kills on regen-heavy targets. Imperion is still good as an extra CC and better vs ranged; Executing Blade is better vs tanky opponents (and at Challenger, everyone is tanky).
- Grapple - +20% shield and an extra engage. Also goated for group PvP: pulls 4 enemies into a clump for a Doom Shield knockdown → Annihilate reset → AoE Annihilate potential (insane at level 20).
- Mobility chain: lead with Poach → Shield Rush (10s CD) → Doom Shield → by then Poach is back. Alternate mobility skills so you always have a CC, gap-closer, or pull available. Grapple backs up Poach if it fails.
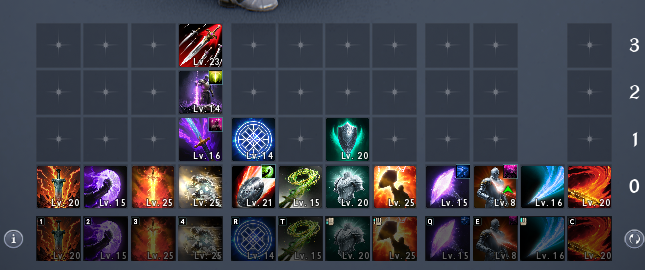
Used when farming open world but needing to be PvP-ready. Rotation is built on Doom Shield: Doom Shield gets resets off mobs, heals off the mob, then back into combat. Rush to a mob and infinite-reset while PvE-ing.
- Doom Shield level 15 (currently), Battlefield Banner level 10, Grapple level 10, Imperial Lord's level 10.
- General rule: Battlefield Banner lv15 is better than Doom Shield lv15 for both PvE and PvP; Doom Shield lv15 is better for PvX (the goal there is resetting off mobs).
🎚️ Skill Specialties
Specialties change per game mode. Below are the choices that actually matter - the rest default once you hit level 20 and can take all three options.
- Pummel: Multi Hit + Warding Strike cooldown (procs more Judgments) + Absorb HP.
- Punishing Strike: extra damage on the second hit - weave both punishing-strike hits into your Judgment combo (combat-speed dependent).
- Shield Rush: Move to Target on bosses as a mobility skill; reset cooldown only for open world. In a dungeon, go Max HP Protective Shield (start the fight with a shield).
- Debilitating Smash: 50% chance to trigger is necessary - this is the defense reduction that starts your combo and drives your damage. Take the negative cooldown.
- Judgment: Critical Hit + Remove Cooldown. The extra damage is better than crit if you crit; if you don't crit, crit is better - subjective until you have all three at level 20.
- Flash Rampage: MP Restore at low level is nice; Multi Hit is nice; can swap to HP for survivability.
- Debilitate: for pure PvE, take Debilitate Duration (keeps the defense debuff on the boss longer) over incoming-heal (which is more a PvX pick).
- Punishment: inflicts DoT + 30% skill speed. The DoT does an extra ~20k - roughly 50% extra damage since the base hit is only ~40k. DoT also helps hold aggro.
- Shield Rush (continued): cooldown reduction + extra stamina (more dodges / survivability in Transcendence) + 100% damage to targets with incapacitated immunity (i.e. bosses).
- Defiance: remove stun → extra stamina + HP. Damage tolerance is great at level 16 (not there yet).
- Pummel: Absorb HP + Multi Hit (breaks shields) + deal more damage.
- Punishing Strike: extra damage on hit (12% + flat) is clutch - with enough combat speed you fit more punishing strikes into the weave. At level 17 go for the extra damage + absorption; you'll want all three eventually.
- Poach: Status Effect Resistance + Max HP.
- Shield Smite: cooldown + Debilitating Smash.
- Judgment: Critical Hit + Remove Cooldown (not used for PvP).
- Debilitating Smash: take the healing reduction - absolutely necessary for PvP; ignore block/evasion lands as multi hit is also good.
- Warding Strike: same as PvE.
- Shield Rush: take the 10m range (not extra stamina) - extra engage so you don't get kited.
- Annihilate: Knockdown Chance + Cooldown Reduction - absolutely want this.
- Punishment: cooldown speed + DoT - 20k extra damage and keeps targets in combat (goated). If you want to one-shot, ignore block/evasion lands as crit is better.
- Capture Change: extra mobility if CC'd; better vs ranged. Vs melee, Tenacity (status effect chance reduction) may be better.
Mostly the same as PvP - the main difference is the stigmas, not the specialties. Sol runs essentially the same spec between PvX and PvP; only the stigma selection changes.
🌟 Daeva Board Pathing
You will eventually get every node, so this is about pathing order when you are new. The rule is simple: always path toward your main DPS skills first, then your main DPS passives. The 5 board layouts (Azphel, Nezekan, Triniel, Vaizel, Zikel) are on the global build page.
- DPS skills first: Pummel → Judgment → Punishment → Annihilate (grab the gold nodes along the way). Starting from Nezekan you'd path to Judgment, then Pummel, then the gold node.
- Main DPS passives next:
- Fury
- Punishing Benediction (slightly better for PvP)
- Insulting Roar (slightly better for PvE)
- Impact Hit - very important (double chance + impact-type chance)
- Then survivability: Survival Willpower and Ironclad Defense (congruently important - damage tolerance + defense/endurance).
- Then: Block Pain (PvP damage tolerance + flat HP).
- Last priority: Guardian Seal, then Warding Shield.
🃏 Arcana Cards
Arcana cards are how you push skills to level 20. Sol is pulling +1 Judgment, +1 Punishment, +2 Pummel from Arcana - exactly the 3 skills he needs at level 20.
On the next reset, craft a gold chalice and put Judgment on it. The goal: +3 Judgment on the chalice → level 20 Judgment. That is the headline target for the next build update.
| Slot | Best Skills to Roll |
|---|---|
| Chalice | Judgment, Punishment, Annihilate (for lv20 Annihilate). You can only put one skill on it - Sol puts Judgment and RNGs the rest. |
| Parchment | Judgment, Punishment, Annihilate, Debilitating Smash. |
| Compass | Pummel, Warding Strike, Shield Smite, Defiance (PvP) / Flash Rampage (PvE). |
| Bell | Fury, Insulting Roar, Enhance Health, Punishing Benediction. |
| Mirror | Survival Willpower, Impact Hit, Ironclad Defense. |
🏛️ Pantheon
Sol gets most of his Pantheon from the Shugo Festival - the first three steps of Daeva crystals, then the artwork. The decision of what to get next is driven by which stats you care about on your profile.
- Illusion = Cooldown Reduction - really important.
- Space / Time - important stats to target.
- Destiny = Endurance Chance - goated for an endurance build, but Sol isn't stacking enough endurance yet to prioritize it.
- Life - gives immediate return; Illusion + Life is a solid near-term pick.
Current pantheon statues (e.g. the Draknear statue) are placeholders until Sol can get Zyklos / Koremede Might statues. The plan is to collect blue paintings to replace the greens, and eventually gold paintings from world bosses. Each statue is contributing meaningful stats (35 / 35 / 32 / 32 / 32 across slots).
🐾 Pets & Genus Insight
Pets are a massive stat source and Sol has been grinding them hard - 163 pets, catching every pet in the game. The payoff so far: +22 Might, +66 Accuracy, +30 Evasion, +31 Dex, +200 Stamina.
Sol locks best-in-slot yellow (gold) stats rather than hard-focusing heroic until all other genus insights are level 9. Target stats per slot:
| Stat Type | Best (ideal) | Settle For |
|---|---|---|
| Attack | Max Attack + Attack Bonus | Attack |
| Defense | Defense | Critical Damage Defense |
| Crit/Acc slot | Accuracy (to hit in PvP) | Crit |
| Chance slot | Double Chance | Damage Boost / Front Attack Damage Boost |
| Endurance slot | Damage Tolerance (locked) / Endurance (late game) | - |
| Defensive slot | Defense | Critical Damage Defense, Accuracy, Crit, Block (full defensive) |
The Special Insight is the only slot that is special - it also wants Max Attack / Attack / Defense. HP increase on a gold genus is "whatever" - defense is preferred there.
🏅 Titles
| Mode | Title | Stats |
|---|---|---|
| PvP | Trading on Black Rings | Defense Bonus + Cooldown Reduction |
| PvE | Golden Glow | Defense Bonus |
| PvE (alt) | Executioner's | Combat Speed + Move Speed (combat speed = more damage); 107k combat power |
- Stats over gear score - a blue with good stats beats a gold with bad stats. Never stat-pad.
- Build Block, Accuracy, Crit, Perfect Resistance, Status Effect Resistance, Willpower on every piece.
- Focus Might for attack scaling; stack toward 1,000 block.
- Rings: skill levels over power - keep blue rings that push Judgment / Punishment toward level 20.
- DPS skill priority: Pummel → Judgment → Punishment → Annihilate.
- Run PvE / PvP / PvX loadouts; swap stigmas, not whole specs.
- Daeva board: path to the 4 DPS skills first, then Fury / Punishing Benediction / Insulting Roar / Impact Hit, then Survival Willpower / Ironclad Defense.
- Arcana: craft a gold chalice for Judgment → level 20 Judgment.
- Pantheon: target Illusion / Destiny / Space / Time; buy the late-game endurance path.
- Grind pets for raw stats; lock best-in-slot golds on genus insight now, transition to heroic later.
- Tools: NotMeter (DPS + boss timers) and ExitLag (ping optimization).