
This build maps my Templar setup to a global-ready configuration. If you already read the Templar Ultimate Guide, the gearing philosophy, arcana priorities, and rotations still carry over. What changes for global is the stigma layout and, most importantly, how it shifts between level 45 and level 50.
- Class: DPS / Berserk Templar - the god-mode PvX class. Build one PvX set, not separate PvP/PvE sets.
- Do this first: grab every Skill Point Shard, rush the abyss for the item level 50+ Holy set, run Dark Veil wings, and get Judgment + Punishment + Pummel toward Lv20.
- End state: Enraged Kromede weapon, White Dragon guard + accessories, Nuakum armor. Full White Dragon armor is a whale-only luxury.
🛡️ Equipment & Gear Path
There are three ways to gear for PvE, and which one you pick comes down to how much time you want to sink:
- Dungeon weapons, armor & accessories is the casual player path.
- Crafted gear is the vertical progression route, and it is what future-proofs your character.
- A mix of both is what most people actually run: lean on dungeon gear until you can transition fully into crafted.
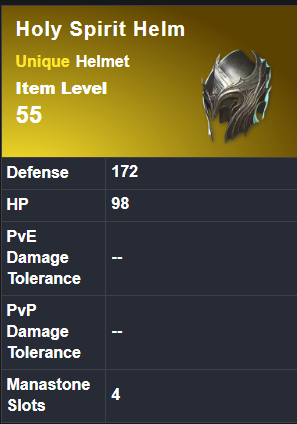
The Holy Spirit pieces are the target here. They sit at item level 55, carry a healthy defense and HP block, and come with 4 manastone slots each, so they are worth binding into properly rather than treating as a throwaway step.
The Upgrade Ladder
Once you have the full Holy set and your stigmas slotted, you should be sitting around 1600 CP. That is the gate. From there the gear path runs like this:
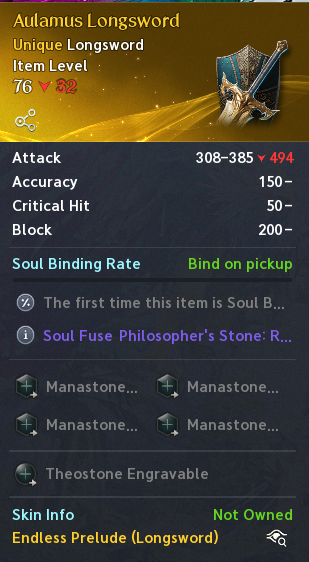
- Aulamus Longsword from Urugugu Canyon. This is your first real weapon jump: a Unique longsword at item level 76 with a big attack range (308 to 385), plus Accuracy, Crit, and Block baked in. It binds on pickup, so commit to it once it drops.
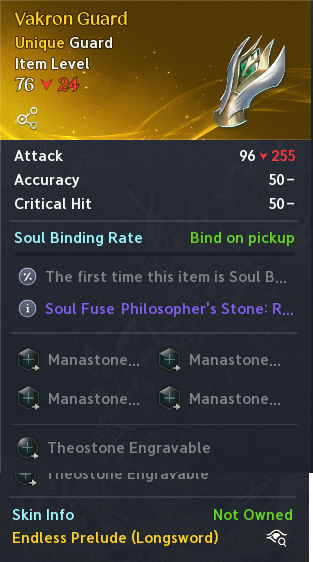
- Vakron Guard, picked up while you run Vakron Sky Island. A Unique guard at item level 76 that rounds out the Vakron transition.
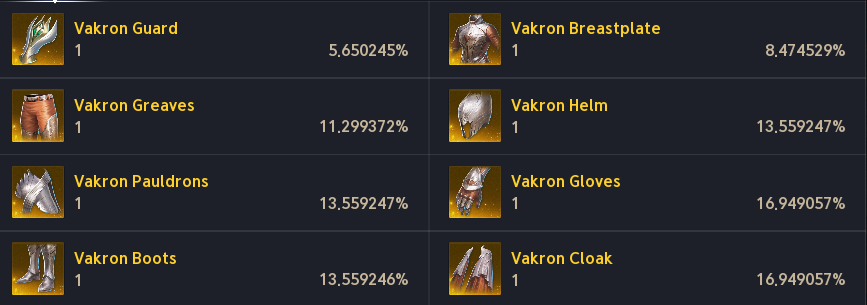
- Keep upgrading your Vakron gear (Breastplate, Greaves, Helm, Pauldrons, Gloves, Boots) until you are strong enough to run Fire Temple.
- Fire Temple is your next fork in the road.
Fire Temple and Beyond
When you can clear Fire Temple, you have a choice to make:
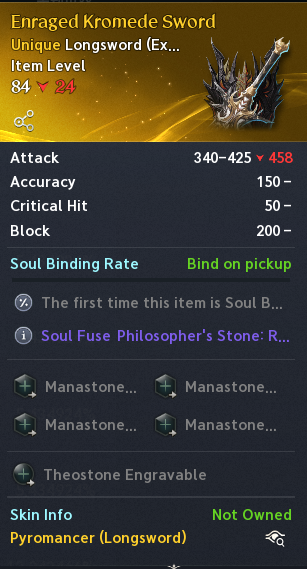
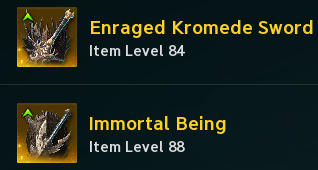
- Spam Fire Temple for the Enraged Kromede extended weapon. This is a Unique (Extended) longsword at item level 84, stepping your attack range up to 340 to 425. It is the payoff for grinding the temple.
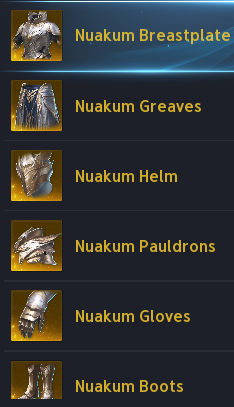
- Farm Ferocious Horn Den for the Nuakum gear set (Breastplate, Greaves, Helm, Pauldrons, Gloves, Boots), your next full armor tier.
The End Goal - Best in Slot
Everything above is the road. This is the destination. Your best-in-slot target splits into two setups: a pure PvE build, and the PvX build I recommend for most players. Pick one before you sink resources into a weapon or a full set you will not use.
The pure PvE target. Chase it in this order: weapon first, then guard, then accessories.
- White Dragon Lord Longsword - your BiS PvE weapon.
- White Dragon Guard - the matching guard.
- White Dragon accessories.
- Nuakum armor for the body pieces.
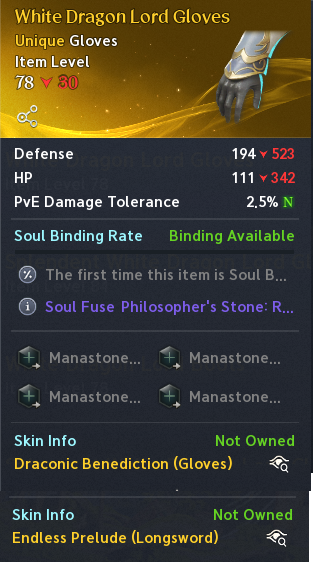
This is the setup I recommend for most players. It keeps you strong in PvE while staying flexible, and it leans on gear you are already farming rather than a separate PvP set. Aim for:
- Enraged Kromede Longsword as your mainhand.
- White Dragon Guard for the off-hand.
- Nuakum armor for the body.
- White Dragon accessories to finish the setup.
🪽 Wings
Wings are a straight damage-and-cooldown upgrade, and for Templar the cooldown part is the whole game - less shield-skill cooldown means more Judgment procs. Prioritize accordingly.
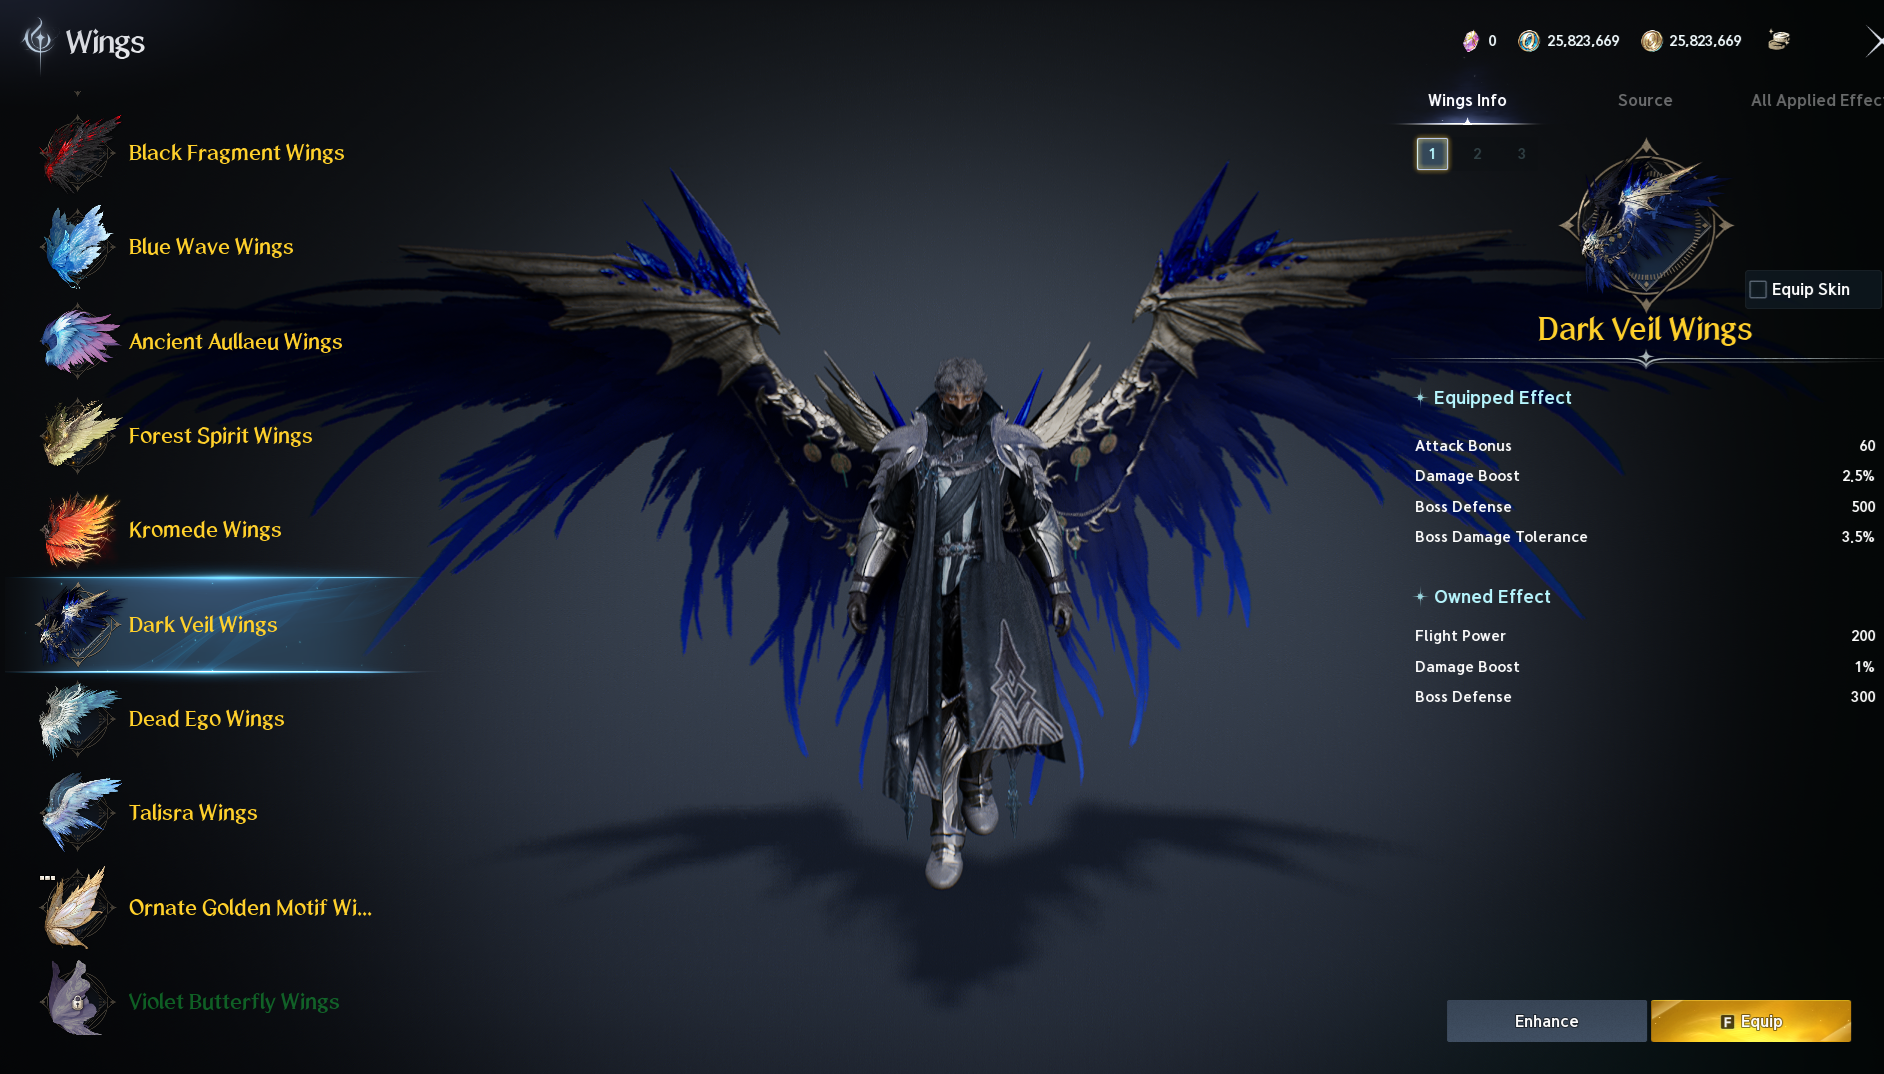
Run Dark Veil Wings early. They bring strong attack and damage bonuses, which is exactly what you want while you are still building up your gear and combat power.
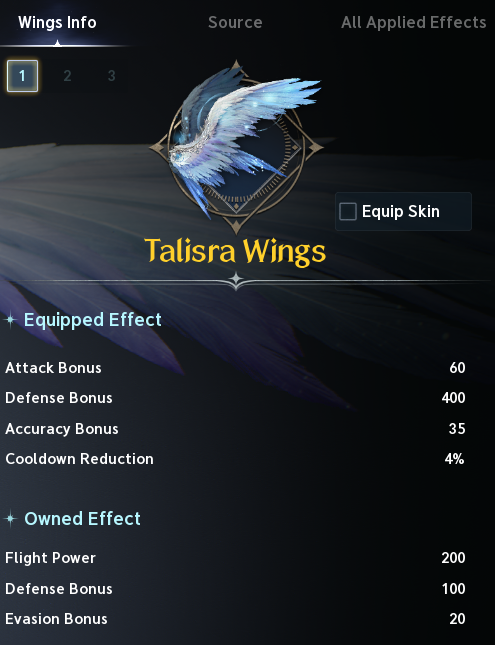
Talisra Wings are the best-in-slot pick. They carry Cooldown Reduction, the single most important wing stat for Templar, so they are what you transition into for the long haul.
Beyond your equipped pair, collect every wing for its owned effects and flight power - both are very useful for abyss farming.
🐾 Pet Genus
Level the Genus to 10 (max) as soon as you can for the better stat values.
Each Genus board has preferred stats per slot. Cogni, Fera, Varian, and Special all share the same layout. Natura differs on slots 4 and 7 (uses multi-hit/perfect stats instead of crit dmg).
Cogni, Fera, Varian & Special
| Slot | Best Stats |
|---|---|
| 1 | Attack Bonus, Max Attack |
| 2 | HP Increase, Defense Increase |
| 3 | Accuracy Bonus, Critical Hit (Block for block-based builds) |
| 4 | Critical Dmg Boost, Dmg Boost (+ Status Effect Chance for PvP) |
| 5 | Attack Bonus, Max Attack |
| 6 | Accuracy Bonus, Critical Hit (Block for block-based builds) |
| 7 | Critical Dmg Tolerance, Dmg Tolerance, Endurance (+ Status Effect Resist for PvP) |
| 8 | HP Increase, Defense Bonus, Critical Dmg Def |
| 9 | Accuracy Bonus, Critical Hit (Block for block-based builds) |
Natura (different on slots 4 and 7)
| Slot | Best Stats |
|---|---|
| 1 | Attack Bonus, Max Attack |
| 2 | HP Increase, Defense Increase |
| 3 | Accuracy Bonus, Critical Hit (Block for block-based builds) |
| 4 * | Multi-hit Chance, Perfect Chance (+ Status Effect Chance or Accuracy for PvP) |
| 5 | Attack Bonus, Max Attack |
| 6 | Accuracy Bonus, Critical Hit (Block for block-based builds) |
| 7 * | Multi-hit Resist, Perfect Resist, Endurance (+ Status Effect Resist for PvP) |
| 8 | HP Increase, Defense Bonus, Critical Dmg Def |
| 9 | Accuracy Bonus, Critical Hit (Block for block-based builds) |
- Slots 1 and 5 - Attack Bonus / Max Attack first (biggest CP impact).
- Slot 4 - Critical Dmg Boost or Multi-hit Chance (Natura): highest offensive payoff per slot.
- Slot 7 - Dmg Tolerance or Multi-hit Resist (Natura): best survivability return.
- Slots 3, 6, 9 - Accuracy / Critical Hit (or Block): fill these once the top four are locked.
- Slots 2 and 8 - HP / Defense: last, since they contribute least to your offensive output.
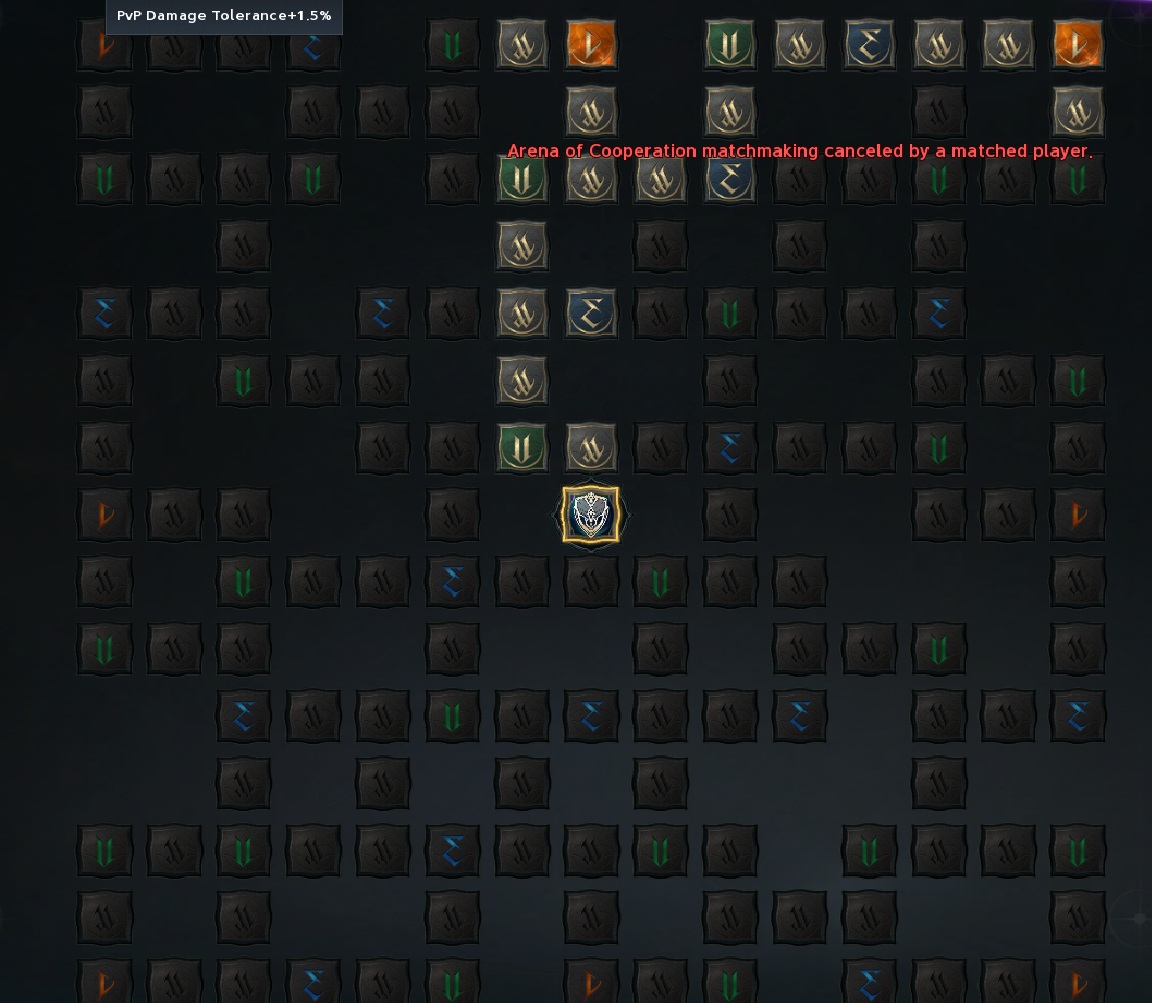
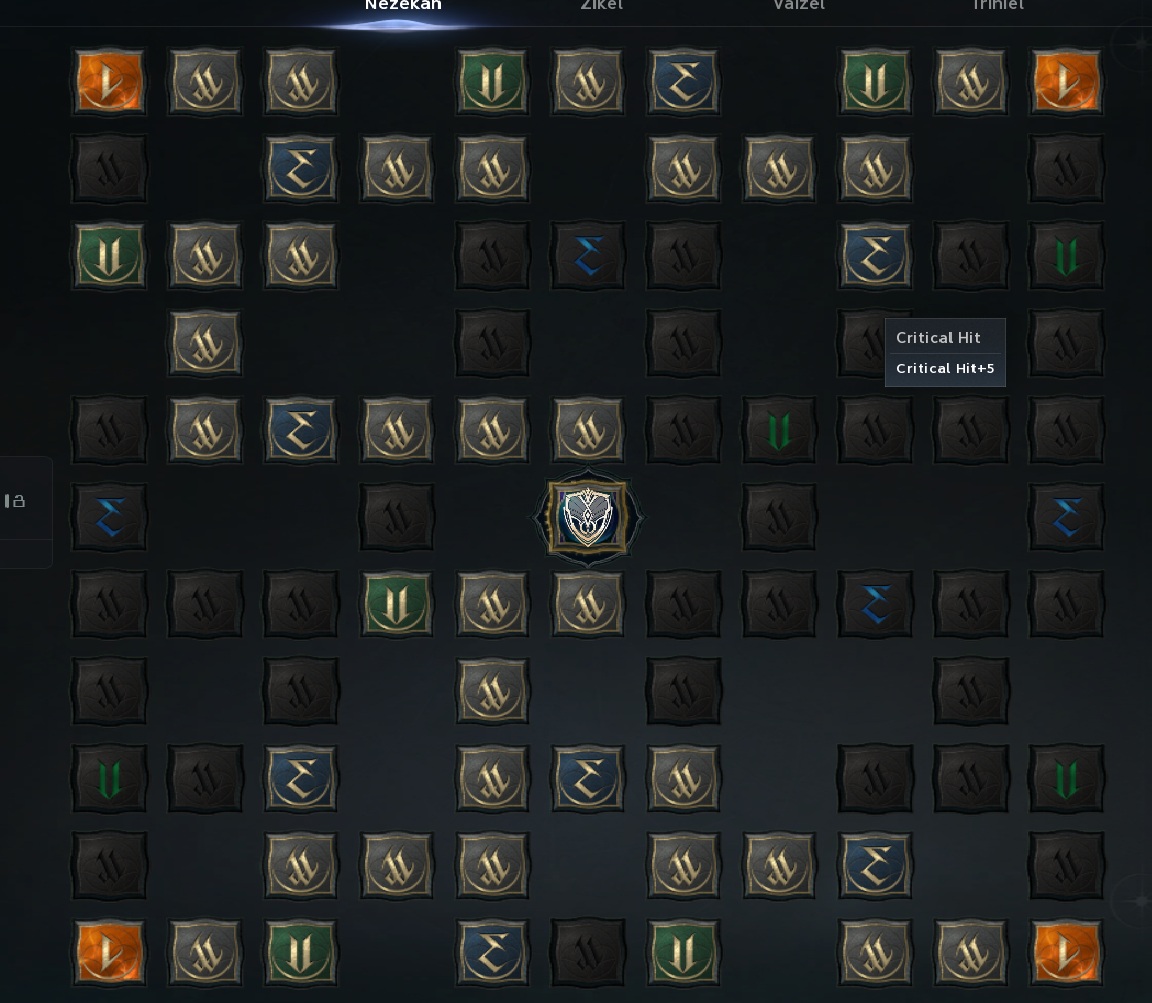
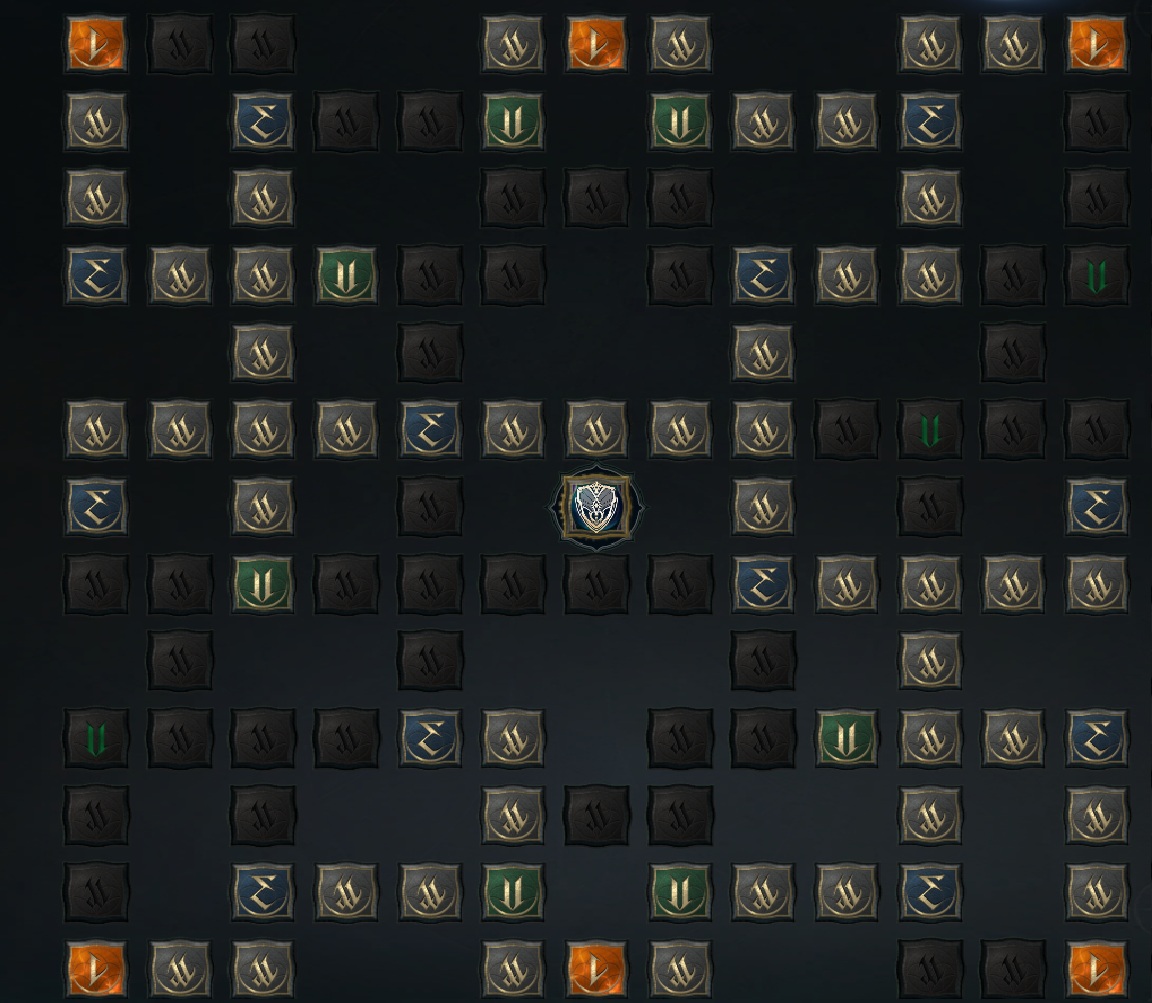
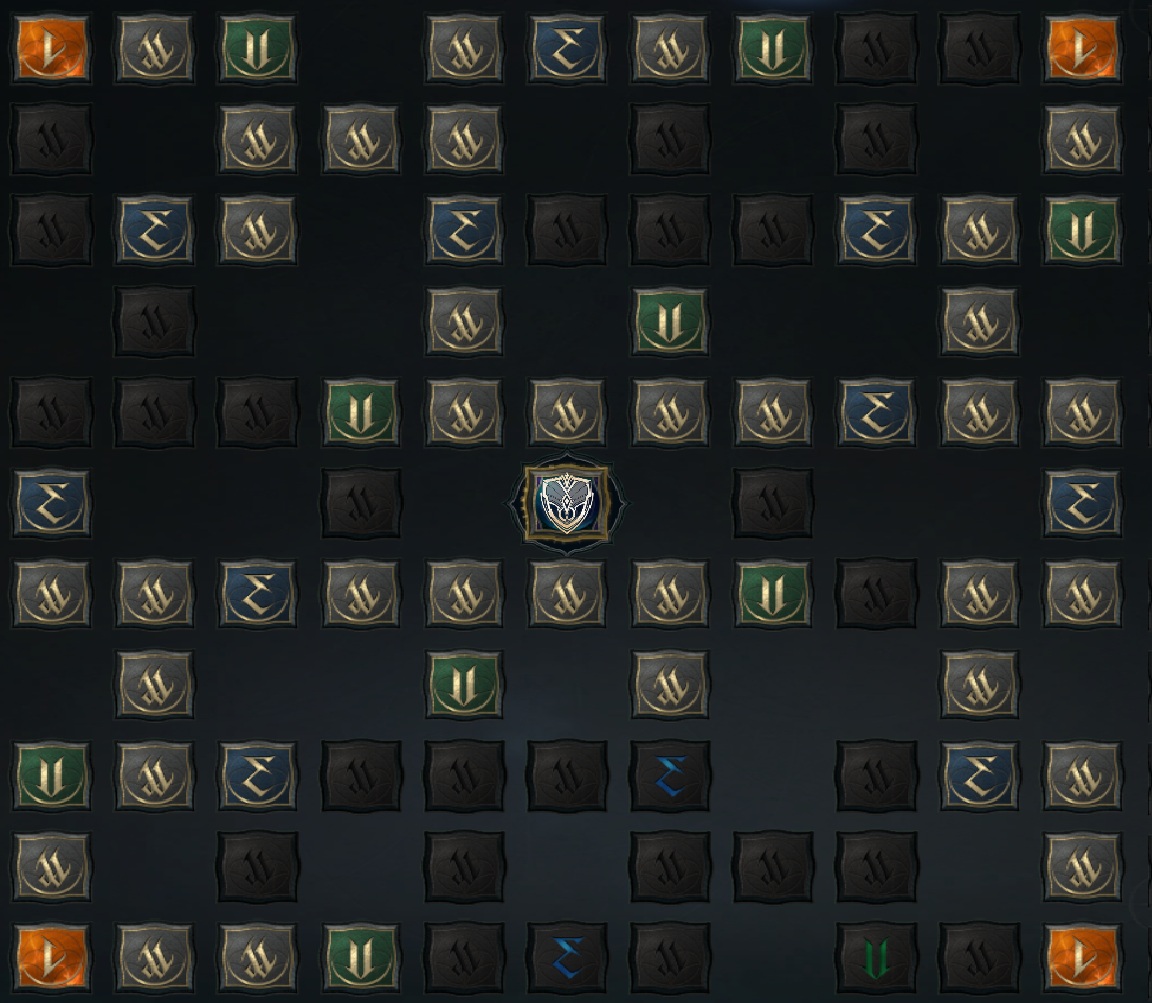
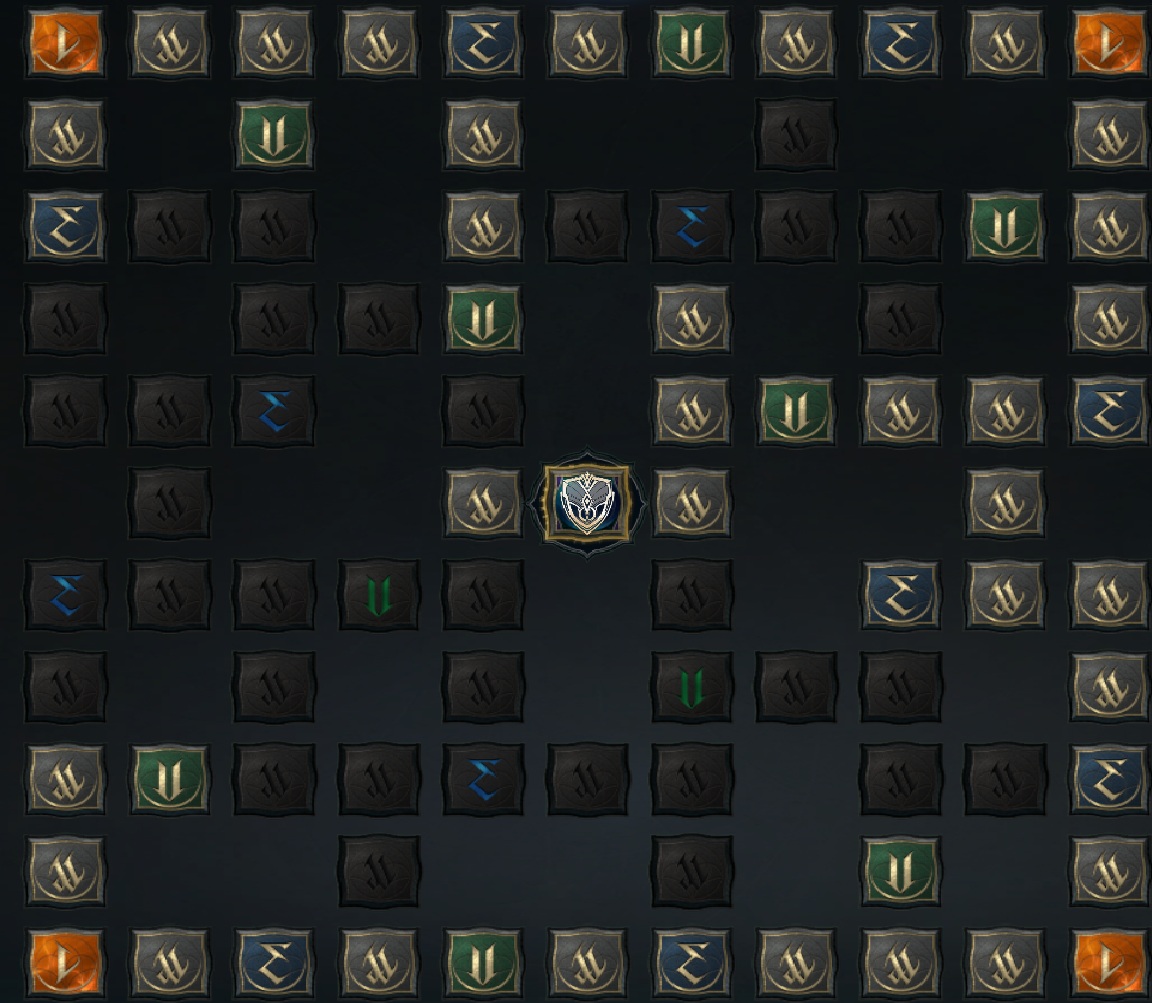
A lot of you keep asking about the Daeva Board, so here are my exact board layouts for each deity. There is one board per Daeva (Azphel, Nezekan, Triniel, Vaizel, Zikel). Match the lit nodes in these screenshots - the colored runes are the active picks, the dark tiles are left empty.
🏛️ Pantheon
Pantheon stat allocation comes down to a short priority list, with a couple of picks depending on whether you are focused on PvE or PvP:
- Wisdom (best in slot) - gives Double Chance.
- Space - gives Block Chance.
- Illusion - gives Cooldown Reduction (crucial for Templar; same Judgment-proc logic as wings and gear).
- Time - gives Attack Speed.
🎮 Interactive Build (Questlog)
Explore the full global build below - skills, stigmas, passives, the David board, and every item. Click around to inspect each node; it is the live build straight from Questlog.
⌨️ Templar Macro Meta - The Holy Trinity
The meta Templar setup is built on the Holy Trinity:
 Judgment
 Punishment
 Pummel
- all three taken to Lv20. With max Judgment, Punishment, and Pummel, you can run the
BIS Macro Setup: animation-cancel Judgment into Pummel for maximum sustained DPS, re-prioritizing
Punishment the moment it is off cooldown.
- Left Click - Quick Slot 1
- Right Click - In-Game Macro (Quick Slot 4)
- C - Quick Slot 2
- R - Judgment (Razer macro key)
- Thumb - HyperSpeed → R, ~10 presses/sec
- Right Click (PvX): Doom Shield → Annihilate → Debilitating Smash → Pummel
- Right Click (PvE): Annihilate → Debilitating Smash → Flash Rampage → Pummel
- Thumb (R): Judgment → Shield Smite → Warding Strike → Doom Shield
Alternate: Annihilate Lv20 (AOE Knockdown)
An alternate to the pure Holy Trinity setup takes
 Annihilate
to Lv20. At max level, its Changes to AoE Skill specialization turns Annihilate into
an AOE Knockdown - huge for crowd control in rifts, the abyss, and grouped PvE, where locking down
multiple targets at once is worth more than a sliver of single-target sustain. Pair it with the -10s cooldown and
+100% damage vs Incapacitated Immunity specs (see the Annihilate card above) for a control-focused variant.
🧬 Skill Specializations (Core Skills)
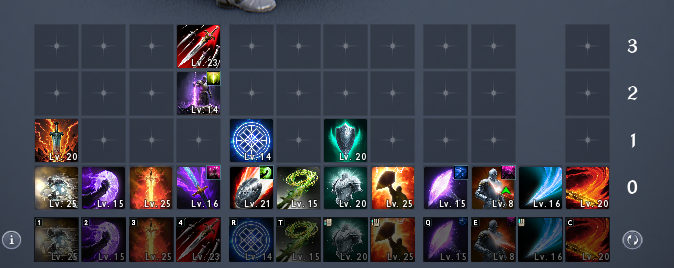
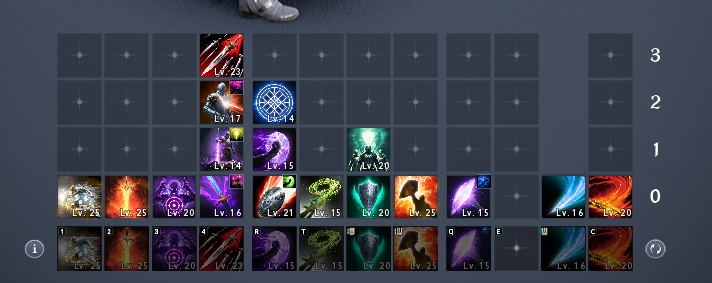
The exact specialization choices on my core skills - what each one is leveled to and which modifiers I picked at every breakpoint. A checked box is a selected specialization; dimmed rows are the higher-level options not yet unlocked at this skill level. Every other skill's spec is live in the interactive builder above.
🎛️ Three Preset Skill Pages
Set up three preset skill pages so you can swap instantly for the situation:
- Profile 1 - PvX: your everyday open-world / rift / mixed page.
- Profile 2 - PvP: arena and abyss fights.
- Profile 3 - PvE: dungeons and boss content.
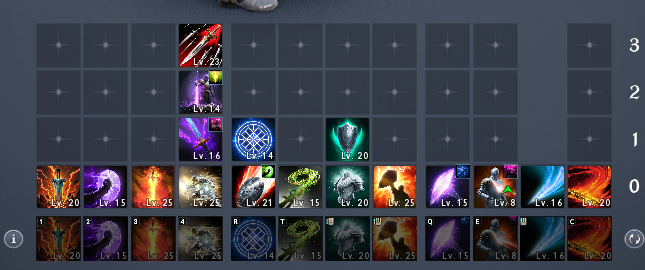
Below, each profile lists the global stigma changes off the base layout. Where a stigma is "removed," that is where your Lv45 vs Lv50 flexibility lives - at 45 you are already down two slots, so lean on these cuts first.
🌀 Profile 1 - PvX (Templar Stigmas)
Your all-purpose page - the one you live in for open-world, rifts, and anything mixed.
 Empyrean Lord
 Executing Blade
 Battlefield Banner
 Doom Shield
 Nezekan Shield
 Comrade in Arms
 Second Skin Second Skin
Executing Blade
- Why these two: they are the safest cuts for the PvX page, which makes them your natural drops at Lv45 when you are two slots short.
- At Lv50, add both back for the full PvX layout.
⚔️ Profile 2 - PvP (Templar Stigmas)
Your fighting page. PvP splits by whether you are solo or rolling with a group, so the swaps differ.
Executing BladeEmpyrean LordDoom ShieldNezekan ShieldComrade in ArmsGroupSecond SkinAlt for Emp Lord Executing Blade
Empyrean Lord
Doom Shield
Nezekan Shield🔀 Alternate: replace
Empyrean Lord
→
Second Skin🤝 For group PvP - replace:
Nezekan Shield
→
Comrade in Arms.
- Solo: run Executing Blade, Empyrean Lord, Doom Shield, Nezekan Shield. Swap Empyrean Lord for Second Skin as the alternate when you want more survivability over the ranged stun.
- Group: keep your damage, but swap Nezekan Shield for Comrade in Arms so you bring team value instead of a purely selfish shield.
- Alternate (lategame): once your gear is deep, Assault Fury is a strong lategame swap on the PvP page - consider it over a weaker slot as you scale.
🐉 Profile 3 - PvE (Templar Stigmas)
Your dungeon and boss page. Like PvP, this splits by group (dungeons) vs solo.
Empyrean LordBattlefield BannerDoom Shield TauntNezekan ShieldComrade in Arms Doom Shield
Nezekan Shield
🗡️ For solo PvE - remove:
Comrade in Arms
Taunt
- Dungeons: drop Doom Shield and Nezekan Shield - your two Lv45 cuts for grouped PvE.
- Solo PvE: drop Comrade in Arms and Taunt - you do not need team utility or threat when you are alone, so these are the cuts here.
📈 Stigma Leveling Priority (Breakpoints)
How you level your stigmas matters as much as which ones you slot. The whole system is driven by breakpoint value - each level milestone on a stigma is worth more or less depending on the game mode, so you chase the breakpoints that pay off for how you are playing.
Step 1 - Unlock all 4 (Lv1)
Before anything else, take all four stigmas for the game mode to Lv1. Breadth beats early depth - you want every tool online first.
Step 2 - First pushes to Lv5
Now take your most beneficial stigmas to Lv5, in this order:
- Lv5 - Empyrean Lord or Executing Blade (whichever fits your mode - see below).
- Lv5 - Battlefield Banner.
Step 3 - Chase breakpoints (Lv10+)
After Lv5, leveling is purely about the value of each breakpoint on your best stigmas. Prioritize in this order, following whichever tags match how you play:
- Lv10 - Empyrean Lord · PvE Prio
- Lv10 - Executing Blade · 1v1 PvP Prio
- Lv10 + Lv15 - Battlefield Banner · PvX Prio
- Lv15 - Doom Shield · PvX Prio
- Lv15 - Nezekan Shield · PvX Prio
- Lv20 - Doom Shield · PvP Prio
- Lv20 - Empyrean Lord · PvP Prio
- Lv20 - Comrade in Arms · PvX Prio
- Lv25 - Executing Blade · 1v1 PvP Prio
- Lv25 - Doom Shield · PvX Prio
- Lv25 - Battlefield Banner · PvE Prio
📊 Lv45 vs Lv50 - Quick Reference
Same presets, two slot budgets. At Lv45 you run without the two stigmas listed as "removed" for that profile; at Lv50 you add them back.
- PvX: Lv45 = full layout minus Second Skin + Executing Blade · Lv50 = both back in.
- PvP (solo): Lv45 = minus Second Skin + Empyrean Lord · Lv50 = both back in.
- PvP (group): run Comrade in Arms over Nezekan Shield at either level.
- PvE (dungeons): Lv45 = minus Doom Shield + Nezekan Shield · Lv50 = both back in.
- PvE (solo): run without Comrade in Arms + Taunt at either level.
🔩 Sub-stat Priority (Per Gear Piece)
Slotting the right sub-stats is what separates a Templar who tops the charts from one who just looks geared. A few mechanics decide everything before you even pick a stat:
- Slot count: dungeon gear has 4 soulbind slots, crafted gear has 5.
- Gold-gear transfer: if a piece is gold, you can transfer its sub-stats into crafted gear, which saves a huge amount of resources over rerolling.
- Line order: stats with variable values (like Double Chance rolling 1.00% to 2.37%) belong in the first few soulbind lines, where the strong rolls land.
- Tier-ups keep your work: the soulbind is retained when you tier up a piece (everything except the soul-fuse line), so binding early is a massive resource saving.
Two Dungeon-Gear Builds
Damage-focused with evasion passives as your secondary. This build pulls ahead against opponents who run lower accuracy, since more of their hits simply miss. A strong pick while the field is still under-geared.
Damage-focused with endurance passives as your secondary. This is the stronger lategame choice: once you reach 100% endurance, the defensive value scales far better than evasion does.
Sub-stats by Slot
This is the priority order to chase on each piece. Read the arrow as "aim for the first, fall back to the next."
- Priority 1: Combat Speed and Weapon Damage Boost.
- Priority 2: Might (for magic DPS) or Smite (for physical DPS), plus Multi-Hit Chance.
- Filler: Precision if you are still under the accuracy cap.
Each armor slot rolls a fixed base pool, one meta unique soulbind you cannot match anywhere else, and then your filler options. Chase the unique roll first, then fill the rest with damage:
| Armor Slot | Base & Potential (Fixed) | Meta Unique Soulbind | Top Global & Filler (Soulbinds / Manastones) |
|---|---|---|---|
| Helmet | Physical / Magic Defense, HP, PvE Defense / Resistance | Incoming Healing (up to 22%) | Attack, Might / Smite, Critical Hit, Precision (Accuracy) |
| Shoulders | Physical / Magic Defense, HP, PvE Defense / Resistance | Critical Damage Boost (~15 to 16%) | Attack, Might / Smite, Precision, Perfect Chance |
| Chest | Heavy Physical / Magic Defense, Max HP Pool | Damage Boost (up to 8.5%) | Attack, Might / Smite, Critical Hit, Constitution |
| Gloves | Base Accuracy, Physical / Magic Defense | Combat Speed (Attack Rate) | Perfect Chance, Attack, Might / Smite, Multi-Hit Chance |
| Legs | Mid Physical / Magic Defense, HP, Evasion | Perfect Chance | Damage Tolerance, Attack, Might / Smite, Constitution |
| Boots | Base Evasion, Physical / Magic Defense | Movement Speed | Perfect Chance, Attack, Might / Smite, Dexterity (for Evasion / Block builds) |
| Cloak / Cape | Base Elemental Resistances, Max HP | Critical Damage Tolerance | Perfect Chance, Damage Tolerance, Attack, Willpower (Anti-CC) |
- Rings: your top 4 active skills, prioritizing your main rotation burst modifiers.
- Earrings: your top 4 passive skills, or Intelligence for CC builds.
- Necklace: 2 active skills plus 2 offensive stats (Attack, Critical Hit, or Weapon Damage Boost).
Crafted Gear - Best in Slot Sub-stats
The finished crafted target. These are the Star Dragon Lord pieces and the exact sub-stat sets to aim for on each:
| Slot | Item | Sub-stats |
|---|---|---|
| Weapon | Star Dragon Lord | Damage Boost, Combat Speed, Weapon Damage Boost, Might, Precision |
| Guard | Star Dragon Lord | Damage Boost, Combat Speed, Weapon Damage Boost, Might, Precision |
| Helm | Star Dragon Lord | Double Chance, Attack Increase, Attack, Critical Hit / Accuracy, Fury |
| Pauldrons | Star Dragon Lord | Critical Damage Boost, Double Chance, Defense Increase, Attack, Critical Hit / Accuracy |
| Top | Star Dragon Lord | Damage Boost, Perfect Chance, Defense Increase, Attack, Critical Hit / Accuracy |
| Legs | Star Dragon Lord | Damage Tolerance, Perfect Chance, Attack Increase, Attack, Critical Hit / Accuracy |
| Gloves | Star Dragon Lord | Combat Speed, Perfect Chance, Defense Increase, Attack, Critical Hit / Accuracy |
| Cloak | Star Dragon Lord | Double Chance, Attack Increase, Attack, Critical Hit / Accuracy, Fury |
| Boots | Star Dragon Lord | Move Speed, Perfect Chance, Defense Increase, Attack, Critical Hit / Accuracy |
| Earrings | Star Dragon Lord | Move Speed, Might, Precision, Attack, Fury |
| Necklace | Star Dragon Lord | Combat Speed, Might, Precision, Attack, Fury |
| Ring | Star Dragon Lord | Might, Precision, Vicious Strike, Judgment, Punishment |
| Bracelet | Abyssal Bracelet | Destruction, Time, Wisdom, Illusion |
💰 Resource Traps - What Bricks New Accounts
Everything above is what to build. This section is how not to waste the resources getting there - the progression systems where new Templars burn kinah and materials they can't get back. Read this before you start dumping resources into anything.
🔩 Sub-stats & Soulbind (biggest resource saver)
How you soulbind gear decides whether your progression is cheap or brutal. The mechanics that matter:
- Slot count: dungeon gear has 4 soulbind slots; crafted gear has 5.
- Gold-gear transfer: if your piece is gold, you can transfer its sub-stats straight into crafted gear - this saves an enormous amount of resources versus rerolling from scratch.
- Line order matters: stats with variable values (e.g. Double Chance 1.00% / 2.37%) should sit in the first few soulbind lines, where the good rolls land.
- Tier-ups keep your work: when you tier up a piece, the soulbind is retained (except the soul-fuse line). Binding early = massive resource savings.
💎 Skill Point Shards - don't skip these
🃏 Arcana & Daevanion Board - Quick Adds
Arcana cards fix your skill allocation through RNG rolls, and you get them from Transcendence dungeons. Farm those once you are able.
Slot your key skills onto the arcana that carries them best. Aim for these first:
- Chalice: Pummel / Punishment.
- Parchment: Judgment / Punishment.
- Compass: Pummel / Shield Smite.
- Bell: Fury / Punishing Benediction.
- Skip MP nodes and reallocate those points to Attack.
- Skip Flash Rampage (saves 3 points; it falls off past mid-game anyway).
- Skip the green Warding Shield / Guardian Shield nodes unless you have spare points.
For the full arcana and David-board pathing, see the Ultimate Guide.
🌍 Global-Ready Notes
- Set all three preset pages before launch so you can swap PvX / PvP / PvE on the fly instead of rebuilding mid-session.
- Decide your Lv45 cuts now. Since you are two slots short at 45, the "removed" stigmas above are your plan - no scrambling when you level.
- Find a legion. Solo you get run over in the abyss. Join the Discord - veteran MMO / AION players.